 The Android NDK is a toolset that allows us to implement parts of our app using native-code languages such as C and C++. There are many articles about integrating Android SDK/NDK and writing some “C/C++” JNI compatible code. JNI is the Java Native Interface. It defines a way for managed code (written in the Java programming language) to interact with native code (written in C/C++).
But today we will talk about:
- the native cross-compiling on the Windows/UNIX-like systems
- uploading of the compiled binary file to the Android device
- running the compiled binary file via Android CLI shell.
And what is interesting, we will not use the Android SDK (except adb utility) or any others Android sources 🙂
Downloading the tools
Download the latest Android NDK for our operating system from Android Developers site.
Windows Users. Download the Cygwin (this is a collection of tools which provide a Linux look and feel environment for Windows) from Cygwin Installation page.
Installing
The NDK installation process is very simple. The only step that we should do is to unzip the NDK archive. We can unzip it to any place because we can delete this folder later. Please remember this path because it will be needed to us to replace the <NDK> text in the commands below.
Windows Users. Please run the downloaded Cygwin Setup program and leave all options “by default” pressing “Next” on the each step. Then we should see the “Cygwin Terminal” link on our Desktop if the installation process successfully completed.
Setup Environment
- Open the “Terminal” program based on our operation system (for Windows, open “Cygwin Terminal” that was installed in the previous step). All commands below should be executed to this “Terminal” application.
- Then go to “NDK Build Tools” folder:
1cd <NDK>/build/tools
Example for Windows & Cygwin (in case we copied the extracted NDK content to the “C:/android-ndk” folder):
1$ cd /cygdrive/c/android-ndk/build/tools/ - Now we must setup standalone Toolchain:
1$ ./make-standalone-toolchain.sh --platform=<PLATFORM> --install-dir=<TOOLCHAIN> --ndk-dir=<NDK>- <PLATFORM> the full list of Android platforms are available in “<NDK>/platforms”
- <TOOLCHAIN> please specify the directory where will be installed standalone toolchain.
Example for Windows & Cygwin below:
1$ ./make-standalone-toolchain.sh --platform=android-9 --install-dir=/cygdrive/c/android-toolchain --ndk-dir=/cygdrive/c/android-ndk/ - Then we need to update $PATH environment variable to include the “<TOOLCHAIN>/bin” directory, so we can execute compiler from any location:
1$ export PATH=$PATH:<TOOLCHAIN>/bin/
Warning!!! When we will restart the “Terminal” program the $PATH variable will be restored to default value (without <TOOLCHAIN>). In this case we should write “export line that wrote above” to our home ~./bash_profile file with this command:
1$ echo "export PATH=\$PATH:<TOOLCHAIN>/bin/" >> ~/.bash_profileExample for Windows & Cygwin below:
1$ echo "export PATH=\$PATH:/cygdrive/c/android-toolchain/bin/" >> ~/.bash_profile - Finish. Check ARM compiler version:
12345# For Unix-like OS$ arm-linux-androideabi-gcc --version# For Windows OS:$ arm-linux-androideabi-gcc.exe --version
And we should receive the result like this:
12345$ arm-linux-androideabi-gcc.exe --versionarm-linux-androideabi-gcc.exe (GCC) 4.6 20120106 (prerelease)Copyright (C) 2011 Free Software Foundation, Inc.This is free software; see the source for copying conditions. There is NOwarranty; not even for MERCHANTABILITY or FITNESS FOR A PARTICULAR PURPOSE.
Compiling the “Hello World” Program
For testing we will use the simple “Hello World” program:
|
1 2 3 4 5 6 |
# include <stdio.h> int main() { printf("Hello, world!\n"); return 0; } |
Please copy the code that is mentioned above into “hello.c” file. The Cross-Compile command will look like:
|
1 |
$ arm-linux-androideabi-gcc hello.c -o hello.bin |
After successful compilation we should see “hello.bin” file. Please read below how to run this file on our Android device.
Running the “Hello World” Program
For copying and running our “hello.bin” program we will need the “adb” tool. What is it? Android Debug Bridge (adb) is a versatile command line tool that lets us communicate with an emulator instance or connected Android-powered device.
Install the “adb” tool
Please go to the “Android SDK” page and click on the “DOWNLOAD FOR OTHER PLATFORMS” link (located at the bottom of the page). From the second table named as “SDK Tools Only” please download the SDK for our operation system. Then unpack it (or install it if we are using Windows & SDK Installer version) to any place (later we will use this path to SDK folder as <SDK>).
Then we need to install the “Android SDL Platform-tools”. We can do it with the “Android SDK Manager”. Run it:
|
1 2 3 4 5 |
# For Unix-like OS: $ <SDK>/tools/android # For Windows OS: $ <SDK>/tools/android.bat |
In the launched “Android SDK Manager” please do these steps:
- Click on the “Deselect All” link
- Check the “Android SDK Platform-tools”
- Click on the “Install 1 package…” button
- Accept the “Android SDK License”
- Press the “Install” button
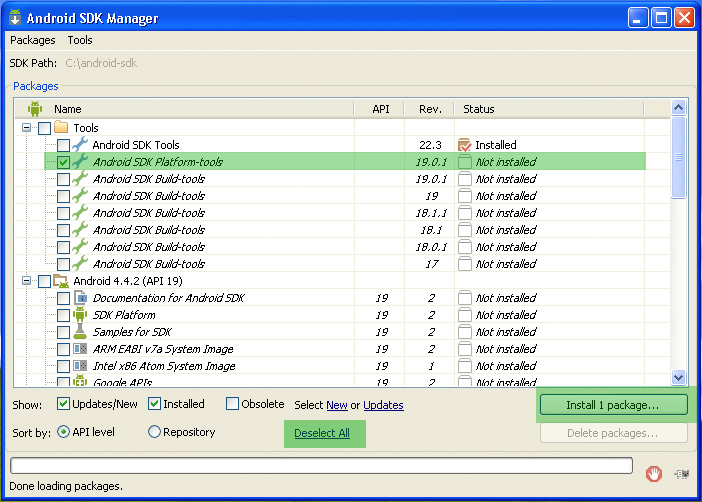
If all steps completed successfully we should see the “Android SDK Platform-tools” status as “Installed”. Now please connect our Android-based device to PC and check it with “adb” tool:
|
1 2 3 4 5 6 |
$ <SDK>/platform-tools/adb devices # Example of this command: $ <SDK>/platform-tools/adb devices List of devices attached 333039F85F1C00EC device |
Install the “hello.bin” program
The easiest way to install binary program is to copy it to any folder on “Android device” where we can setup the “Execute Permission” for the “hello.bin” file. In my case, I have “rooted device” and I can copy binary file to any place. The “copy” command will look like:
|
1 2 3 4 5 |
$ <SDK>/platform-tools/adb push <the path to the binary file on our PC> <the path to the folder on the Android device> # For example: $ <SDK>/platform-tools/adb push hello.bin data/local/tmp/ 532 KB/s (6168 bytes in 0.011s) |
Run the “hello.bin” program
Firstly, we should grant “hello.bin” file with “Execute Permission”. So, now open the command line shell on our “Android device” and execute these commands in order:
|
1 2 3 4 5 6 7 8 |
$ <SDK>/platform-tools/adb shell android@shell: $ cd <the path to the folder on the Android device> android@shell: $ chmod 755 hello.bin # For example, $ <SDK>/platform-tools/adb shell root@crespo:/ $ cd data/local/tmp/ root@crespo:/data/local/tmp $ chmod 755 hello.bin |
And now run the program:
|
1 2 3 4 5 |
android@shell: $ ./hello.bin # Example root@crespo:/data/local/tmp $ ./hello.bin Hello, world! |
The end! 🙂 If this article helped you please share it with yours friends. Thanks!