![]() I received a lot of feedbacks after PlatformIO had been released. Some people have been asking me the interesting questions, such as:
I received a lot of feedbacks after PlatformIO had been released. Some people have been asking me the interesting questions, such as:
Also I’ve received valuable answers and wishes from the “LinkedIn Professionals” (here and here). Most of them like to work with an IDE and preferably Eclipse IDE. As PlatformIO is a console tool with rich commands interface it can work with different IDEs as the “builder, uploader & debugger”.
Today I want to explain how we can build and debug Atmel AVR (Arduino) based project using Eclipse IDE + PlatformIO.
UPDATE: I’m glad to announce that you don’t need to perform these manual steps to integrate PlatformIO with Eclipse. PlatformIO 2.0 has been released with a lot of new features and has built-in project generator for the popular IDEs, including Eclipse. More details here…
Installing Atmel AVR platform with PlatformIO
Firstly we should install Atmel AVR platform. And we won’t build anything from sources because PlatformIO has already pre-built different development platforms for Mac, Linux and Windows OS. (If you haven’t PlatformIO installed in your system yet – here you can read how to do it).
Then using PlatformIO please search for an embedded platform for Atmel AVR micro-controllers:
|
1 2 3 4 |
$ platformio platforms search avr # You should see this output: # atmelavr - An embedded platform for Atmel AVR microcontrollers (with Arduino Framework) |
As we can see, the name of development platform in PlatformIO repository is “atmelavr“. So, install it:
|
1 |
$ platformio platforms install atmelavr |
Check “atmelavr” packages when downloading and unpacking process will be finished:
|
1 2 3 4 5 6 7 8 9 10 11 12 13 14 15 16 17 18 19 20 |
$ platformio platforms show atmelavr # You should see the output like mine: atmelavr - An embedded platform for Atmel AVR microcontrollers (with Arduino Framework) ---------- Package: toolchain-atmelavr Alias: toolchain Version: 1 Installed: *** ---------- Package: tool-avrdude Alias: uploader Version: 1 Installed: *** ---------- Package: framework-arduinoavr Alias: framework Version: 6 Installed: *** |
Installing Eclipse IDE
The installation process of Eclipse IDE is easy and simple: “download, unpack and open it!”. Please go to Eclipse Downloads page and download for your OS “Eclipse IDE for C/C++ Developers”. Unpack it and run.
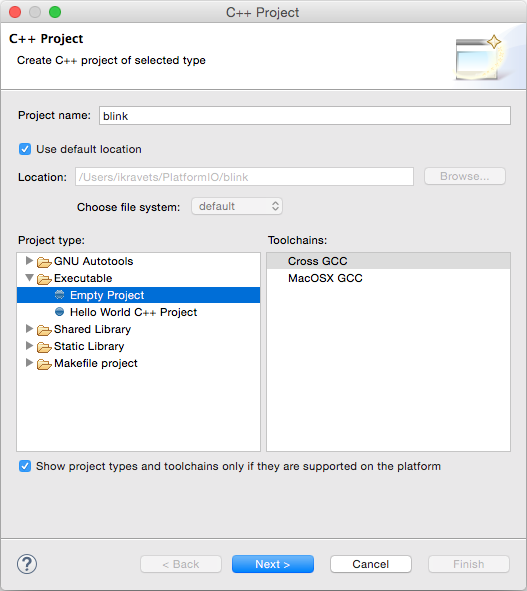
Setup New Project
In Eclipse IDE: navigate to “File → New → C++ Project“, enter “Project name“, set “Project type” to “Executable → Empty Project”, leave “Toolchains” by default in your OS (it doesn’t matter because Eclipse will use PlatformIO with the own pre-built toolchains) and press “Next → Next → Finish” :
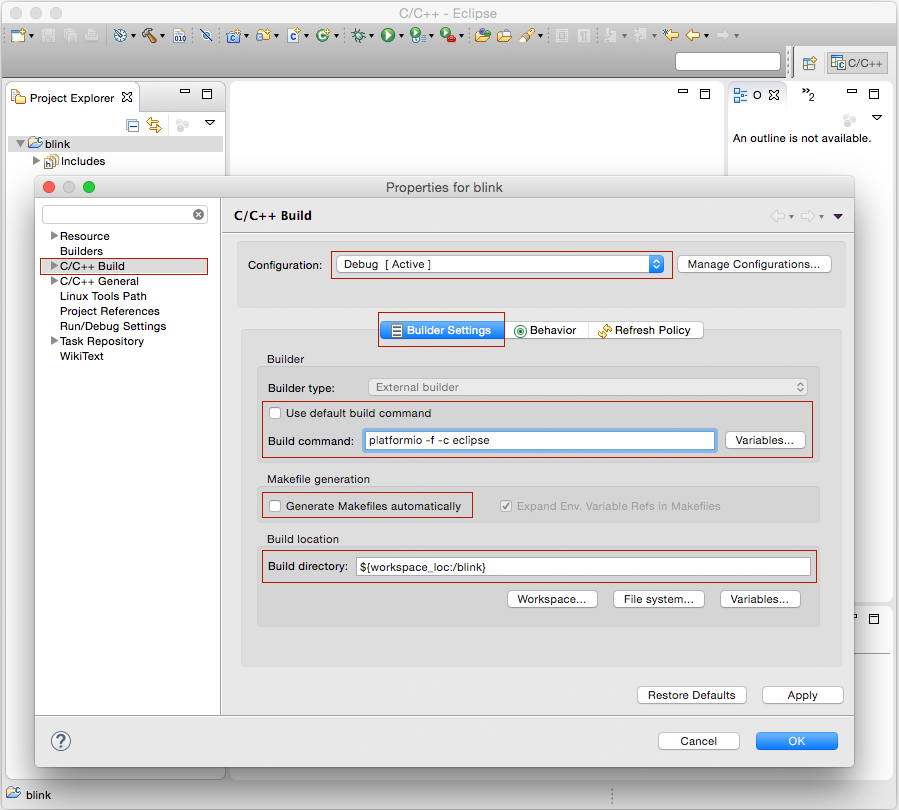
The second step is to configure project source code builder. PlatformIO has own builder and you don’t need to install additional tools (like, Makefile or etc). PlatformIO Source Code Builder works perfectly in the popular OS: Mac OS X, Linux and Windows!
In Eclipse IDE make right click on the created project (“Project Explorer“) : “Properties → C/C++ Build“ and go to “Builder Settings” tab:
- Uncheck “Use default build command” and set “Build command” to platformio -f -c eclipse
- Uncheck “Generate Makefiles automatically“.
- Set “Build directory” to ${workspace_loc:/***_YOUR_PROJECT_NAME_***}
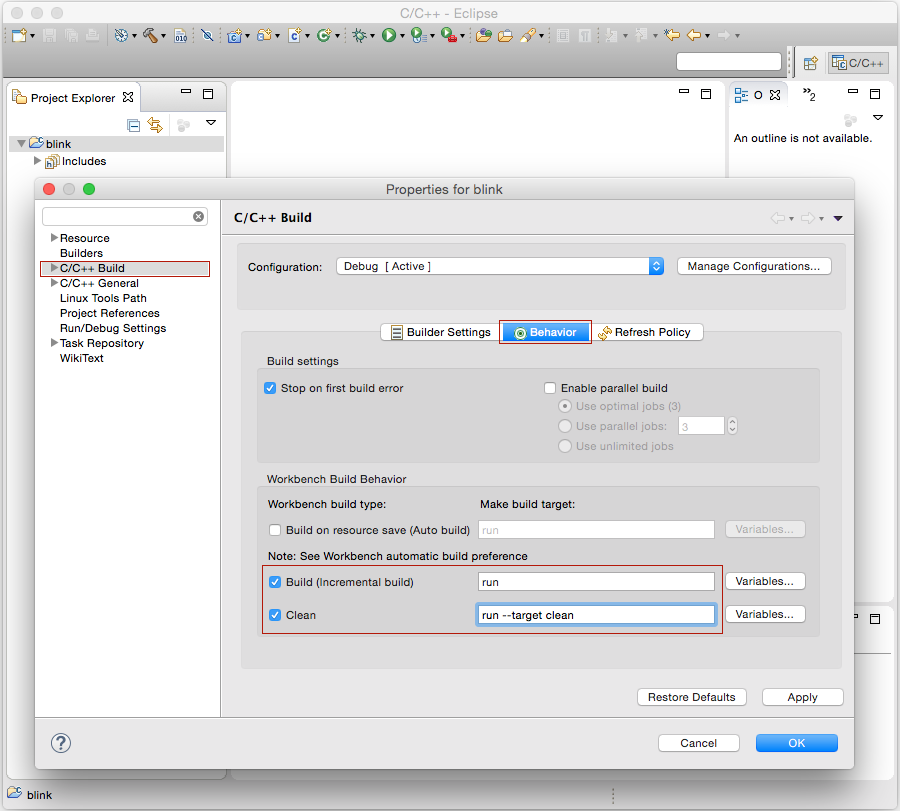
On this pane please follow to “Behaviour” tab:
- Set “Build (incremental build)” to run
- Set “Clean” to run --target clean
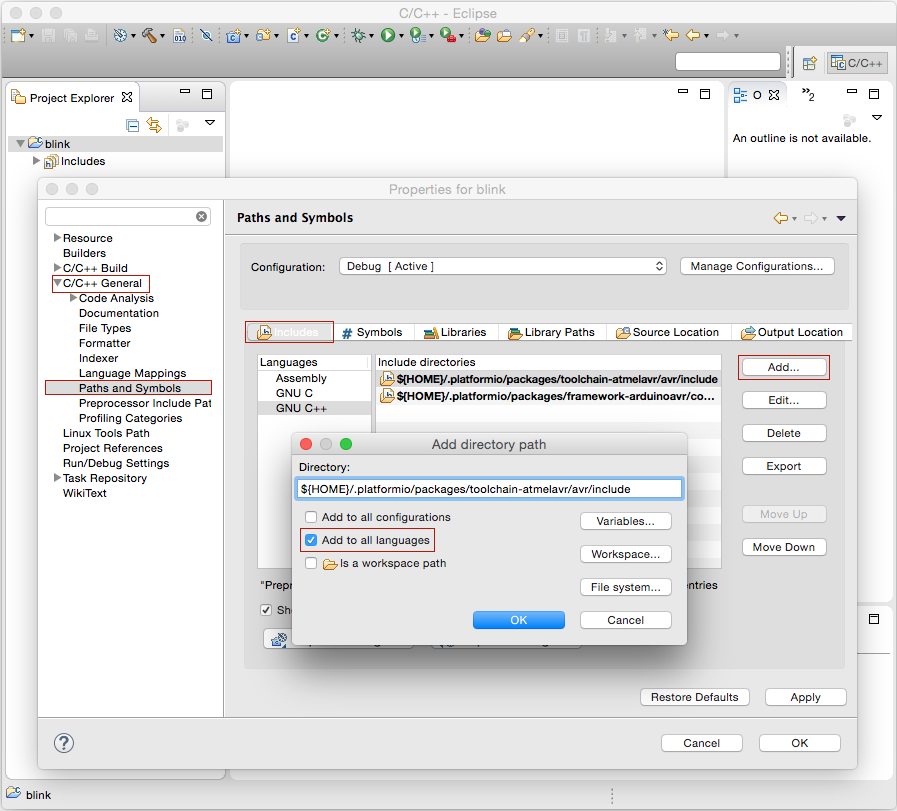
Then setup for the project “Includes“: “C/C++ General → Paths and Symbols Add…“ . And add 2 directories:
- Set “Directory” to ${HOME}/.platformio/packages/toolchain-atmelavr/avr/include and check “Add to all languages“.
- Set “Directory” to ${HOME}/.platformio/packages/framework-arduinoavr/cores/arduino and check “Add to all languages“.
If you want to use native AVR programming, you have to specify additional preprocessor symbol (the next tab “#Symbols” in this pane) about your MCU. For example, an Arduino Uno is based on the ATmega328 MCU. In this case I will add new Symbol __AVR_ATmega328__ with empty Value for “All languages”.

My first “Blink” program
The simple “Blink” program will consist from 2 files:
- Main “C” source file named
main.cpp that must be located in the
src directory.
In Eclipse IDE make right click on the created project (“Project Explorer“) : “New → Folder“ and set “Folder name” to src and press “Finish“. Then make again right click on the newly created src folder: “New → File” and set “File name” to main.cpp and copy the source code which is described below to it.
123456789101112131415#include "Arduino.h"#define WLED 13 // Most Arduino boards already have an LED attached to pin 13 on the board itselfvoid setup(){pinMode(WLED, OUTPUT); // set pin as output}void loop(){digitalWrite(WLED, HIGH); // set the LED ondelay(1000); // wait for a seconddigitalWrite(WLED, LOW); // set the LED offdelay(1000); // wait for a second} - Project Configuration File
platformio.ini
In Eclipse IDE make right click on the created project (“Project Explorer“) : “New → File” and set “File name” to platformio.ini and copy the source code which is described below to it. -
12345678910111213141516## Project Configuration File## A detailed documentation with the EXAMPLES is located here:# http://docs.platformio.org/en/latest/projectconf.html## A sign `#` at the beginning of the line indicates a comment# Comment lines are ignored.[env:arduino_uno]platform = atmelavrframework = arduinoboard = uno# enable auto-uploadingtargets = upload
The full list with supported boards is located here.
Now, you can build project and then upload firmware to your device with shortcut Cmd + B (Mac) or Ctrl + B (Windows/Linux) or “Menu: Project → Build Project“:

NOTICE! If you received this message: “Error: Program “platformio” not found in PATH”, then you need to update Eclipse $PATH variable. In Eclipse IDE make right click on the created project (“Project Explorer“) : “Properties → C/C++ Build → Environment → PATH → Edit” and set to /usr/local/bin:/bin:/usr/bin:/usr/sbin:/sbin .
Hardware debugging
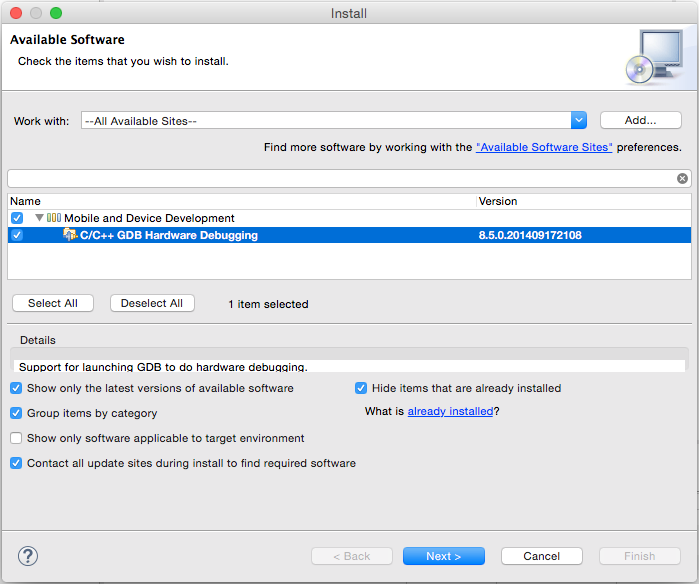
If you want to debug your application, you have to install “C/C++ GDB Hardware Debugging” plugin which allows GDB to do hardware debugging. For this open “Install New Software…” from Eclipse menu, then select “–All Available Sites–” and search with “gdb” query. Put checkbox near plugin and install it pressing “Next” button. Restart Eclipse IDE.
The whole debugging process consists of two parts:
- In the first part we should customise a hardware debugging tool that will communicate from the one side with our hardware device (via JTAG interface or etc.), and from another with GDB over TCP/IP protocol by some port.
For example, if you have JTAG ICE tool you can use avarice AVaRICE Program. But if you haven’t (like me), you can use simulavr a simulator for the Atmel AVR family of micro controllers. All these programs are supplied with PlatformIO and located in ${HOME}/.platformio/packages/toolchain-atmelavr/bin folder. - In the second part we should setup GDB tool:
- specify our JTAG device with TCP/IP data from #1 step
- allow to load symbols at startup from our firmware file
- setup runtime options.
All detailed information about these parts you can find here.
Hardware debugging with GDB + SimulAVR
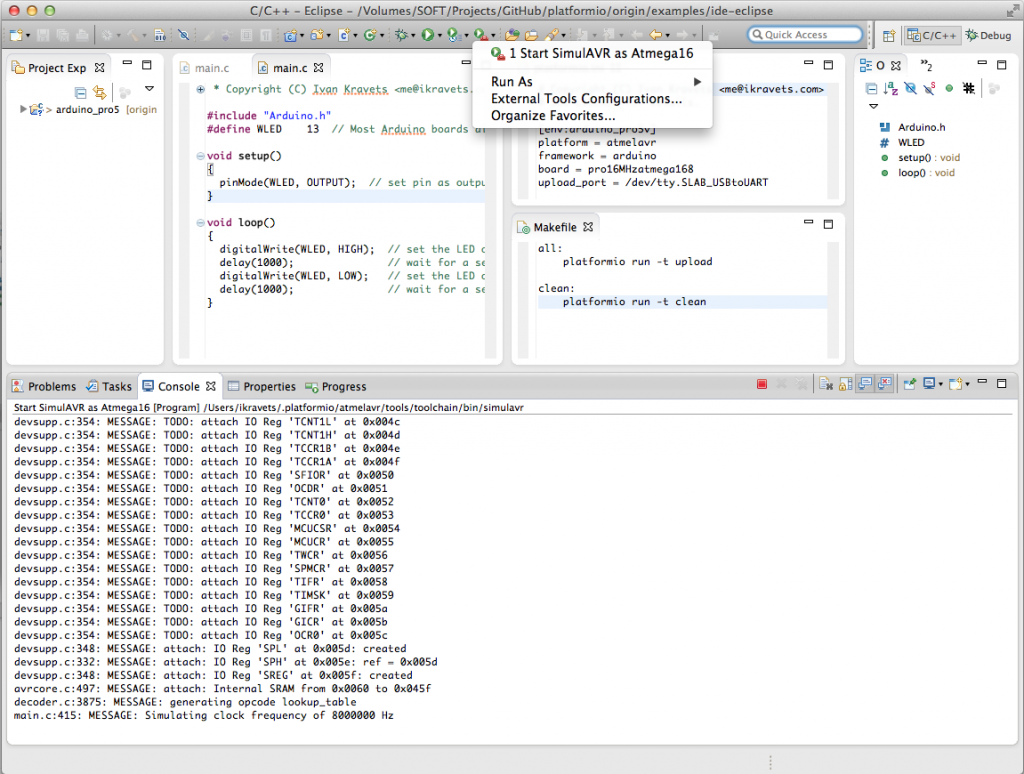
As I just said, I will use simulator for atmega16 device.
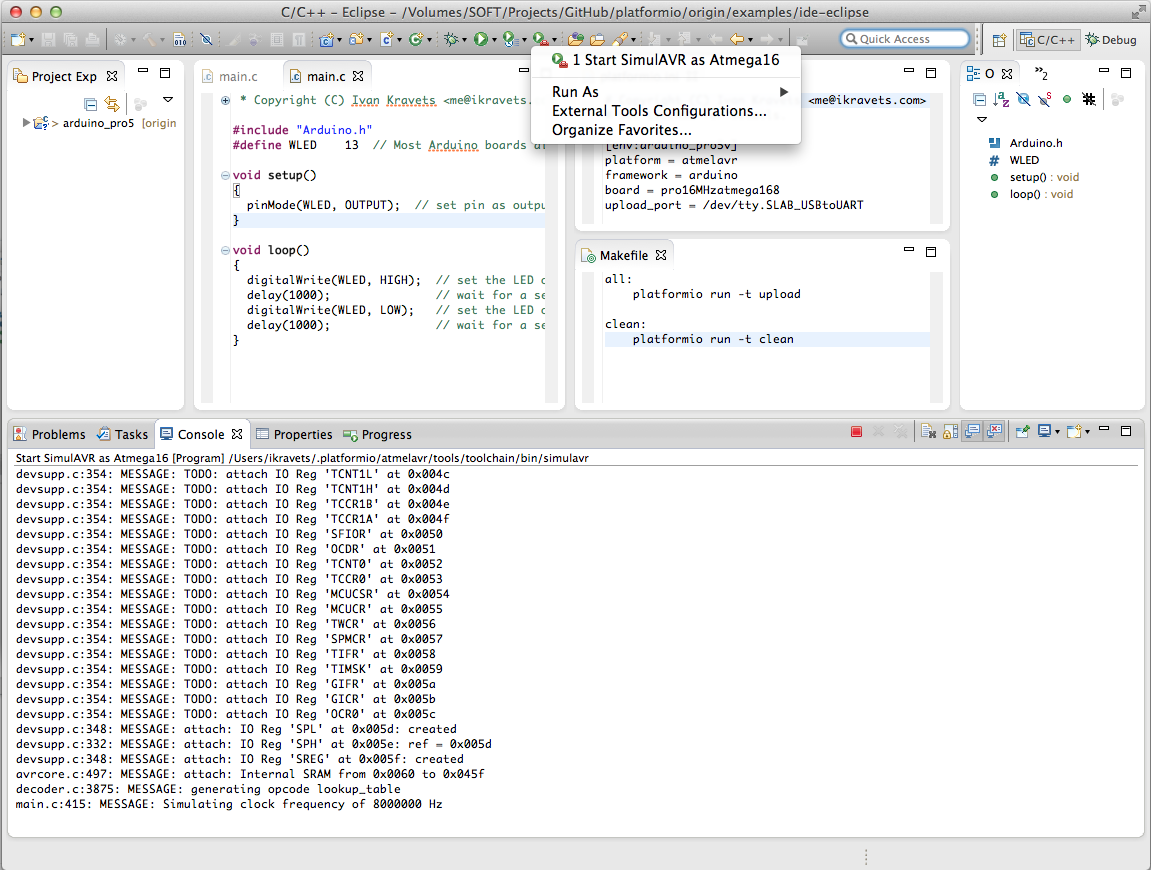
- Run
simulavr via “External Tools” menu:
- Name: Start SimulAVR as Atmega16
- Location: ${HOME}/.platformio/packages/toolchain-atmelavr/bin/simulavr
- Working Directory: ${workspace_loc}
- Arguments: --gdbserver --port 4242 --device atmega16
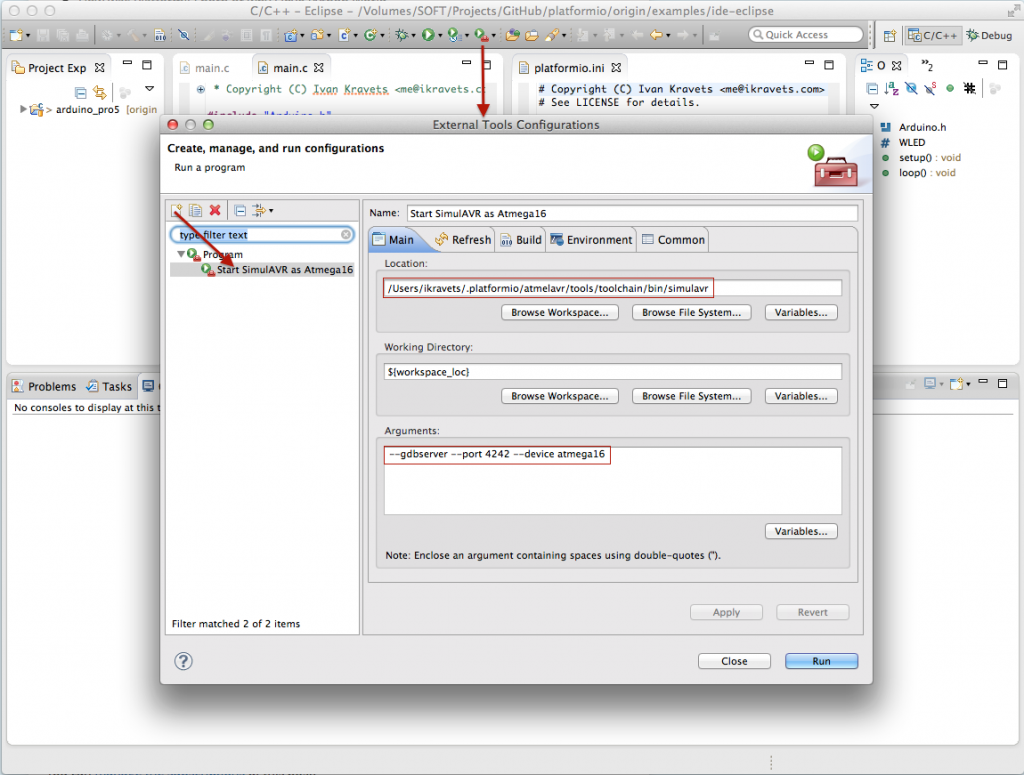 Then you should see similar result:
P.S: If you decided to use avarice , please read avarice manual and setup:- Name: Start AVaRICE
- Location: ${HOME}/.platformio/packages/toolchain-atmelavr/bin/avarice
- Working Directory: ${workspace_loc}
- Arguments: --program --file ${workspace_loc:/blink/.pioenvs/arduino_uno/firmware.elf} --part _DEVICE_NAME_HERE_ --jtag _PORT_HERE_ :4242
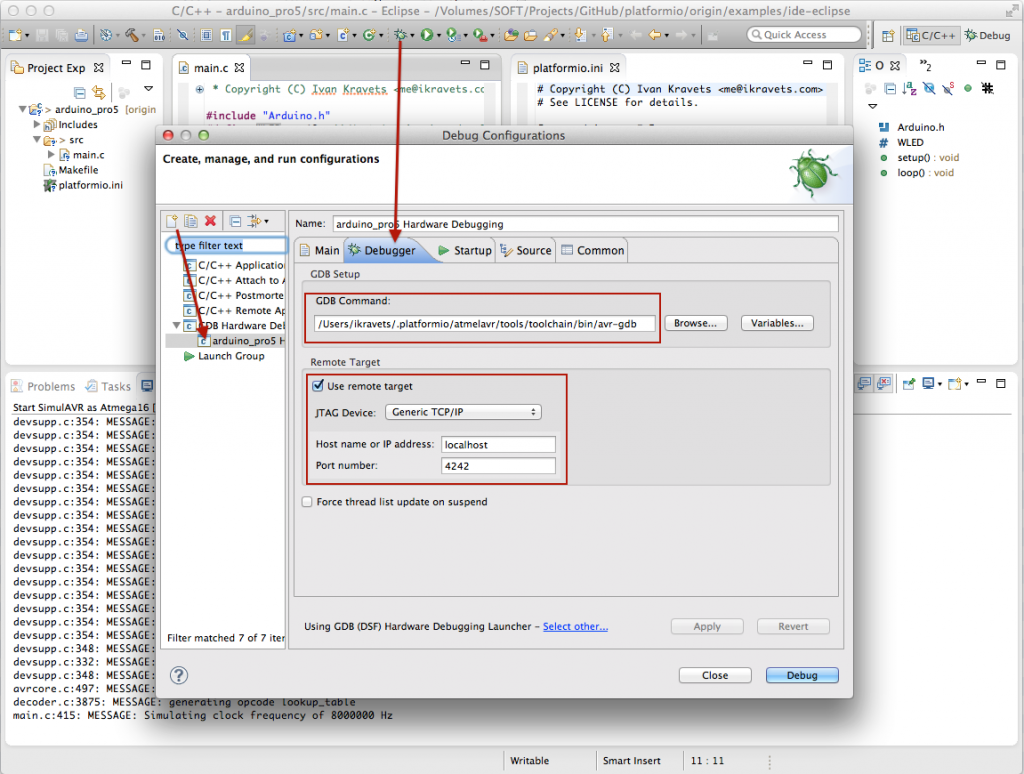
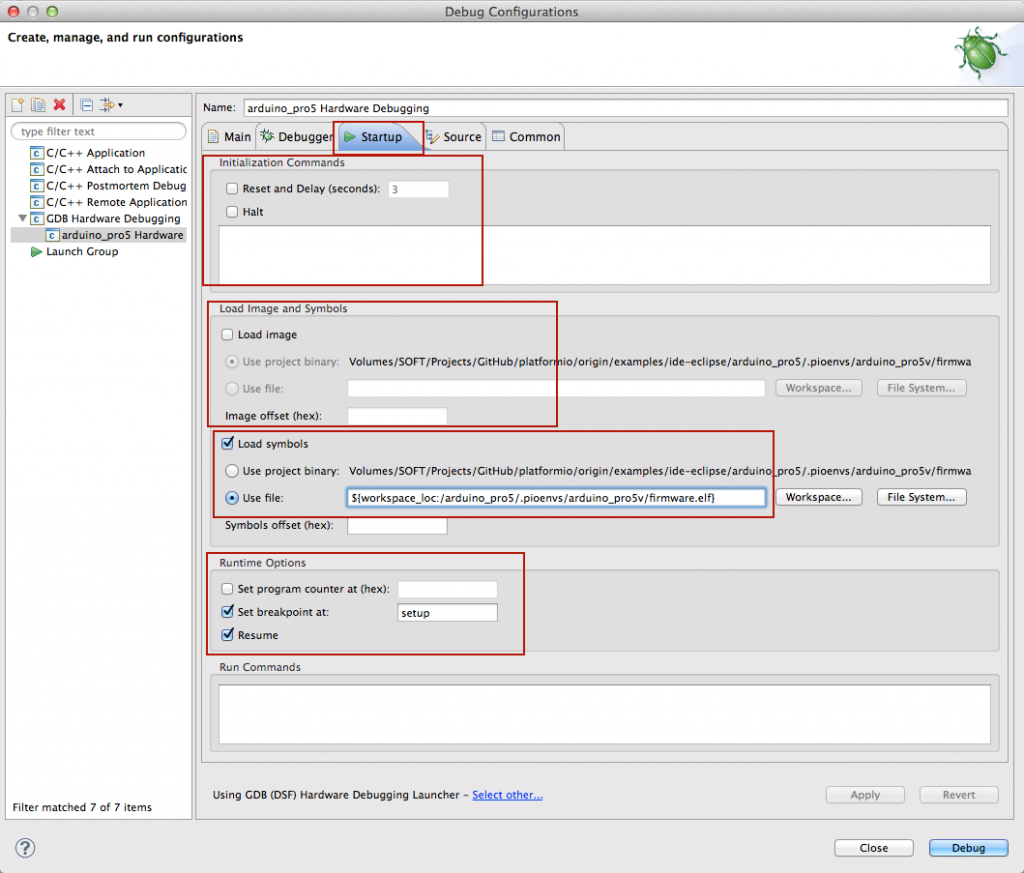
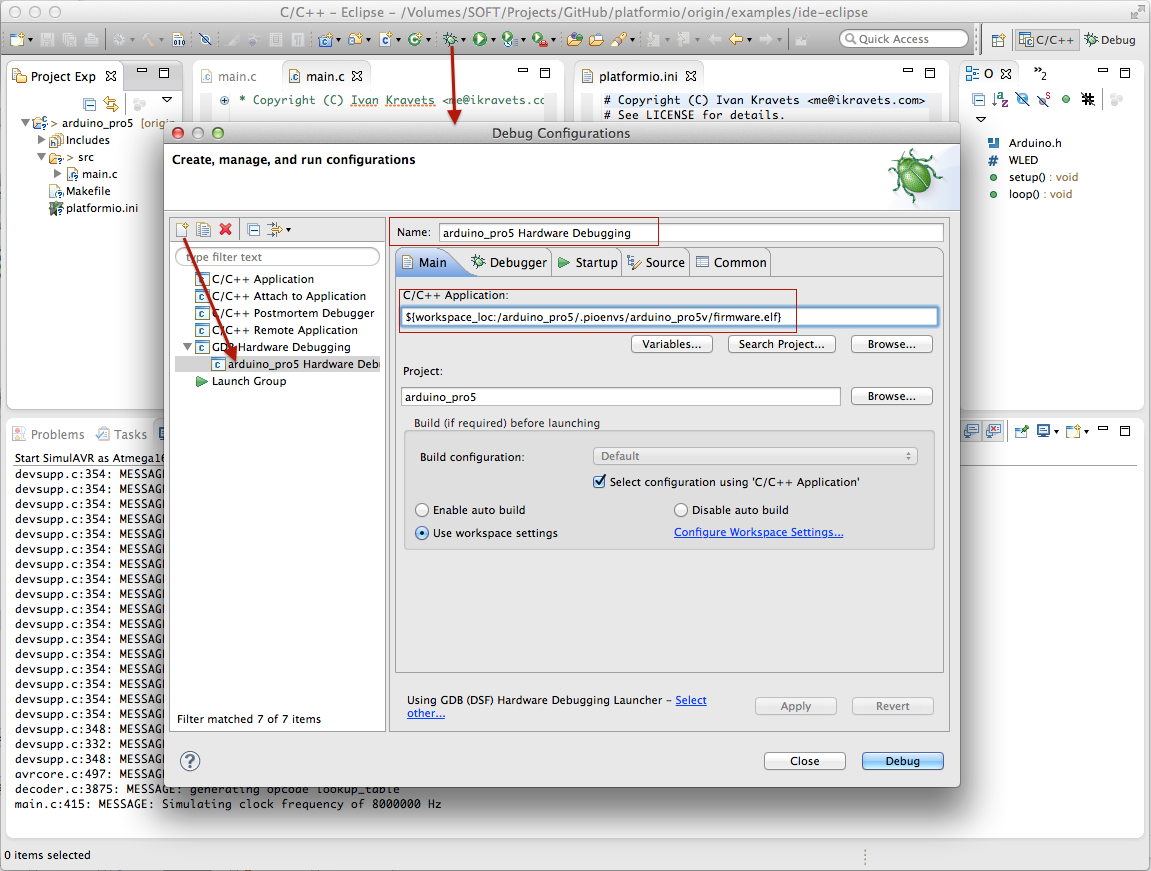
- Setup “Debugging Configuration“:
“Main” TAB:- Name: arduino_pro5 Hardware Debugging
- C/C++ Application: ${workspace_loc:/blink/.pioenvs/arduino_uno/firmware.elf}

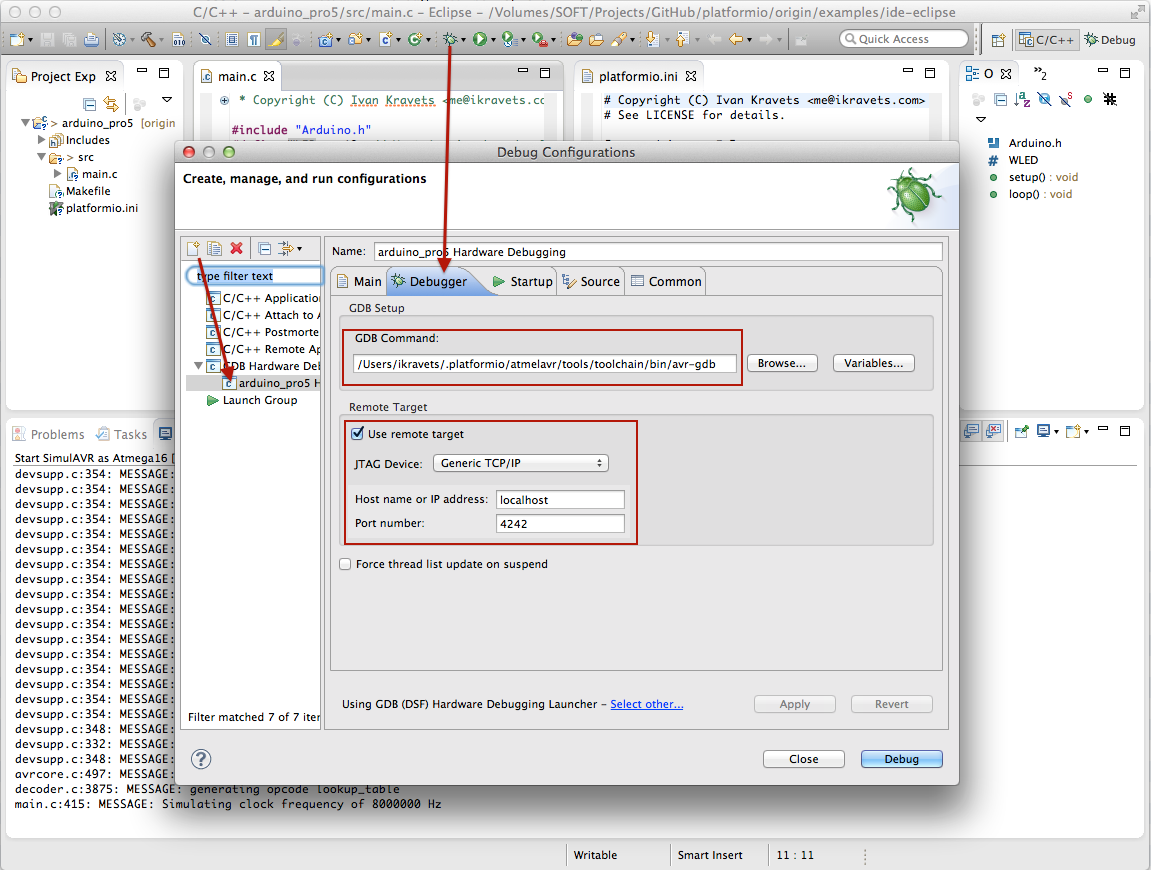
“Debugger” TAB:- GDB Command: /Users/ikravets/.platformio/packages/toolchain-atmelavr/bin/avr-gdb
- Check: Use remote target
- JTAG Device: Generic TCP/IP
- Host name or IP address: localhost
- Port number: 4242
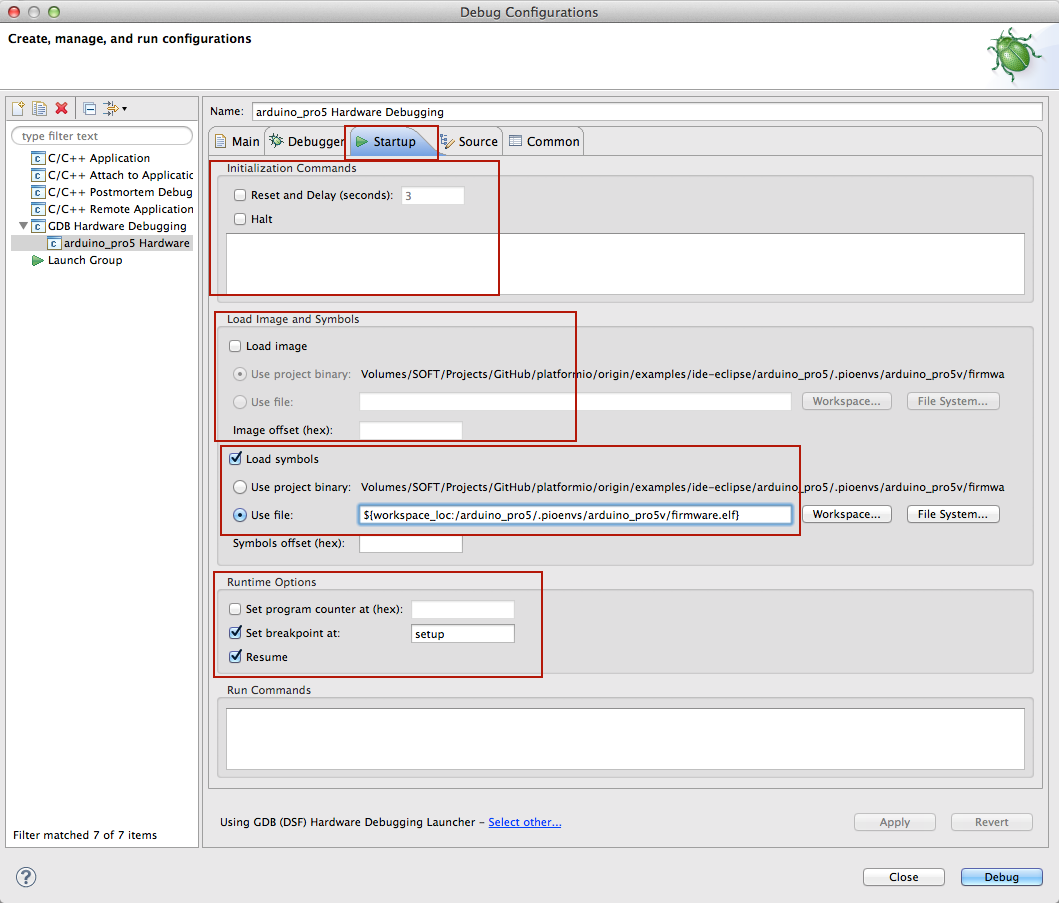
“Startup” TAB:- Check: Load symbols
- Use file: ${workspace_loc:/blink/.pioenvs/arduino_uno/firmware.elf}
- Set breakpoint at: setup
- Check: Resume
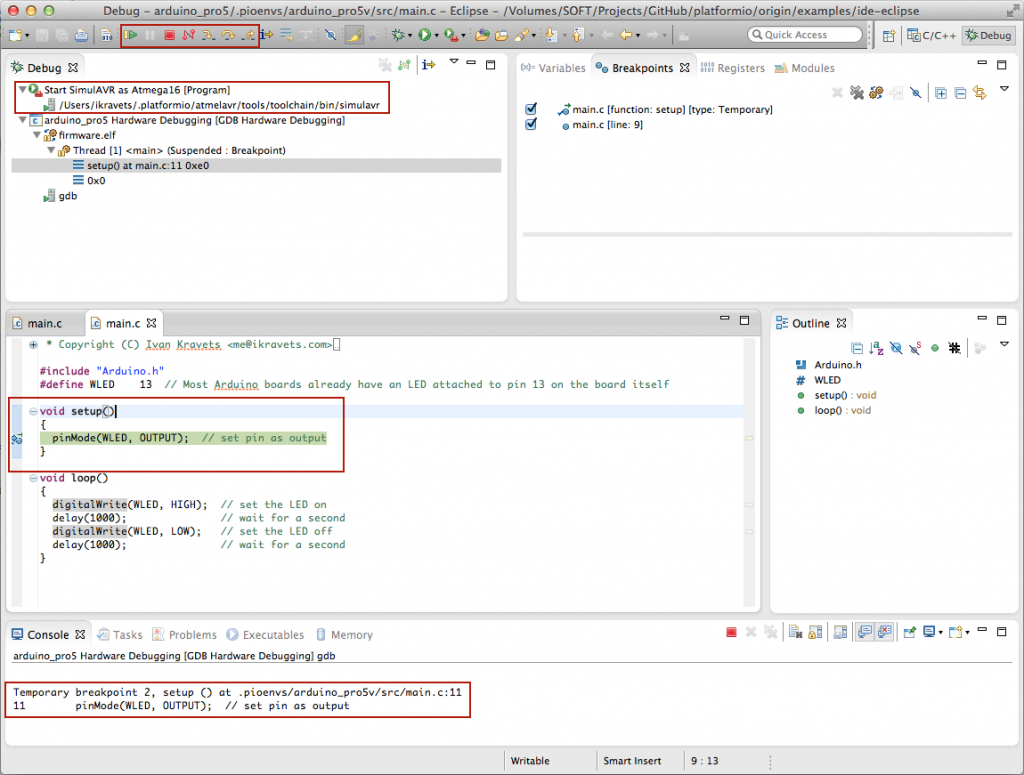
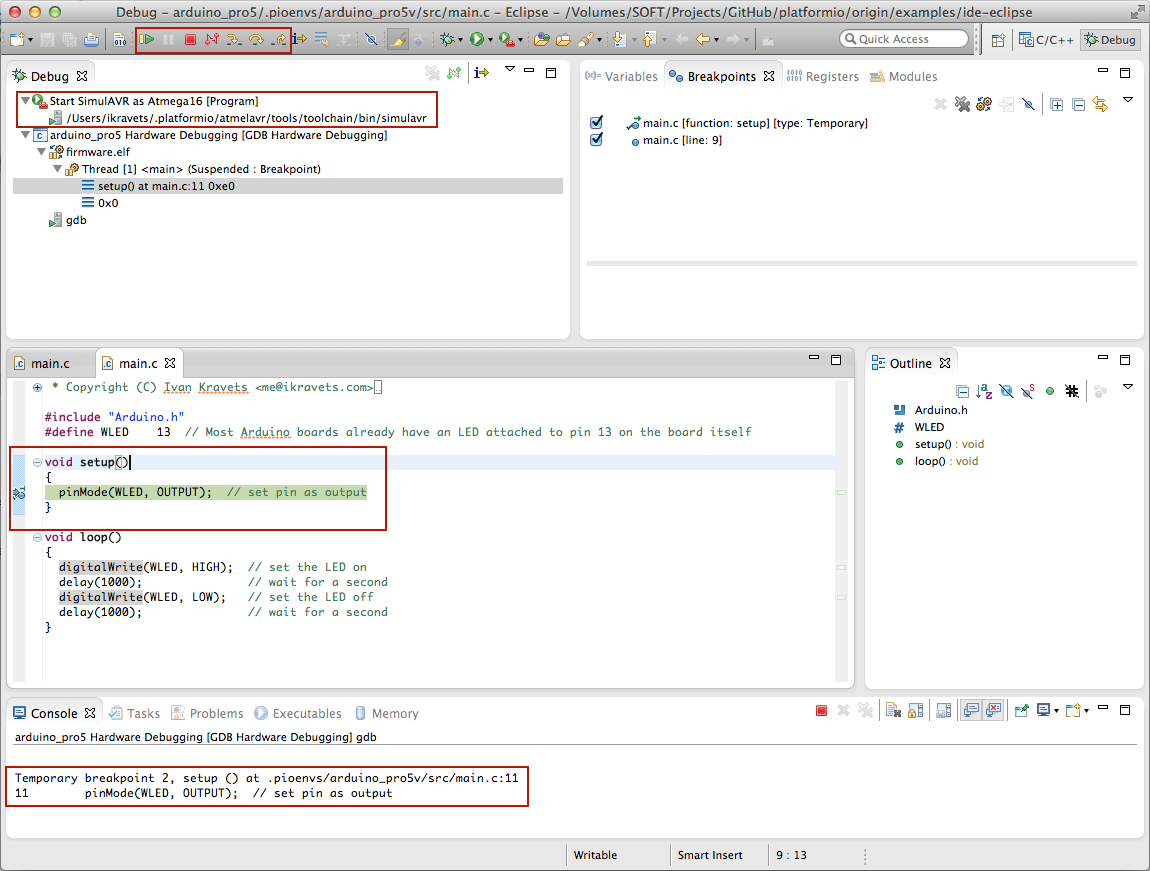
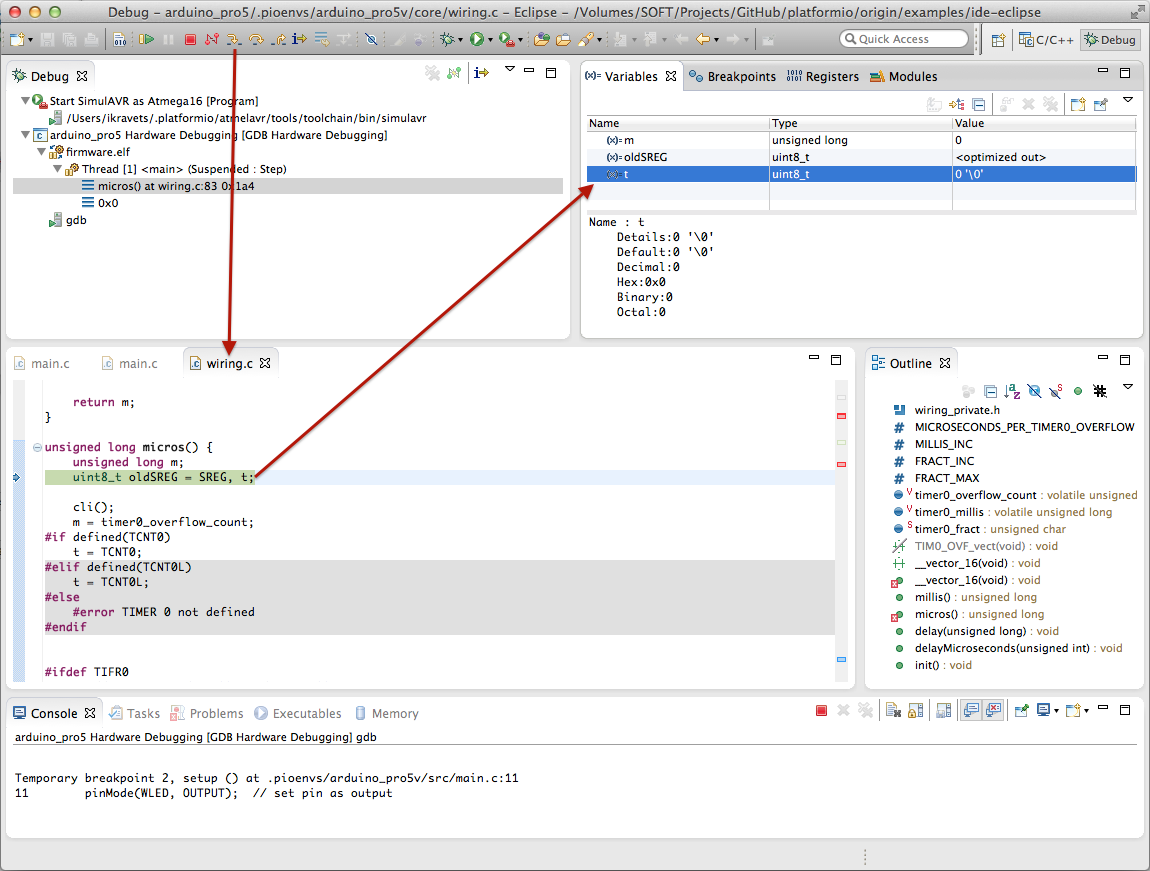
- After pressing “Debug” button you will see this:

Conclusion
I’ve just shown how we can use PlatformIO console tool to build and debug single source code with different development platforms using Eclipse IDE.
You can download already configured project from GitHub Examples Repository.
If you have any questions, don’t hesitate to ask me in the comments below.